• About Us
    • Media
      • Media – Appearances | Conferences
      • Media – Radio | Podcasts
    • Contributors to Stagetecture
  • Decorate | Organize | Celebrate
  • Contact Us
    • Privacy Policy
    • Terms of Use Agreement
  • Advertise
  • Services | Portfolio
    • Facebook
    • Pinterest
    • RSS
    • Twitter

Stagetecture - Living with Style

Simple Meal Planning - Plan to Eat
  • Home
  • Decor By Room
    • Kitchen and Bath
    • Bedroom and Living
    • Kids Organization
    • Office – Home or Work
    • Laundry Room
    • Outdoor Home
    • Home Staging | Home Organization
    • Moving | Realty
  • Food Recipes
    • Brunch
    • Easy Meals
    • Healthy Eating
    • Desserts
    • Drinks
  • Wellness
    • Green Living
    • Family/Kids
    • Pets
    • Travel
  • Inspiration
    • My Decor Lifestyle Ebook
    • Best Of – Round Up
    • D.I.Y.
    • Home Decor
      • Aesthetics – Colors & Textures
      • Architecture
    • Holiday
    • Weddings
    • Linky Parties
You are here: Home / Inspiration / Holiday / Christmas Craft: 3 DIY Wood Slice Ornaments

D.I.Y. Holiday

Christmas Craft: 3 DIY Wood Slice Ornaments

A Christmas craft is always fun to make! What would Christmas be without making some beautiful Christmas tree ornaments? It’s a beautiful tradition that many people cherish and look forward to. Next to a fun activity, making your own ornaments is also a great way to make a wonderful item and  bring out each and every Christmas to remember past celebration. A great way to both create such a wonderful keepsake and to make beautiful Christmas tree decorations is to choose one of these beautiful wood slice ornaments to make.

Christmas Craft: 3 DIY Wood Slice Ornaments

wood slice ornaments
We love this Christmas wood slice ornament from Etsy shop – Gretas Handmade Gifts – Christmas Craft
Disclosure Burlap Wreath3

Wood slice ornaments are easy to make and they don’t cost much, but the result is so rewarding and beautiful, that they can be even given as a thoughtful Christmas present. The essential items you will need to make this Christmas Craft are – obviously – wood slices. Those can be from white pine, birch or any other you find that will fit your needs. Wood slices can be bought from craft stores, but you can easily make your own if you want. Just choose a log and use a saw to make them. To use the wood slices, make sure they are completely dry, especially if you make your own. To do that, you can put them in the oven for a few hours at 200 °F. In each of the wood slices you will need to drill a small hole once you have decorated them, so a ribbon, twine or wire will fit through in order to hang them. Alternatively, you can use an eye screw which you will insert on top of the wood slice.

Christmas Craft: Painted Wood Slice Ornaments

wood-slice-ornament-ideas

Etsy shop – Gretas Handmade Gifts – Christmas Craft

Fine ink markers

Wood slices

Pencil (optional)

Paint style pens in holiday colors, like gold or silver etc.

Chalkboard paint (optional)

Spray sealer (optional)

Matte mod podge (optional)

Stencils / stamps (optional)

Fabric, beads, decorations (optional)

Twine or ribbon

wood-ornaments-christmas-gifts

Visit Etsy shop – Gretas Handmade Gifts for creative ideas! – Wood Slice Ornaments

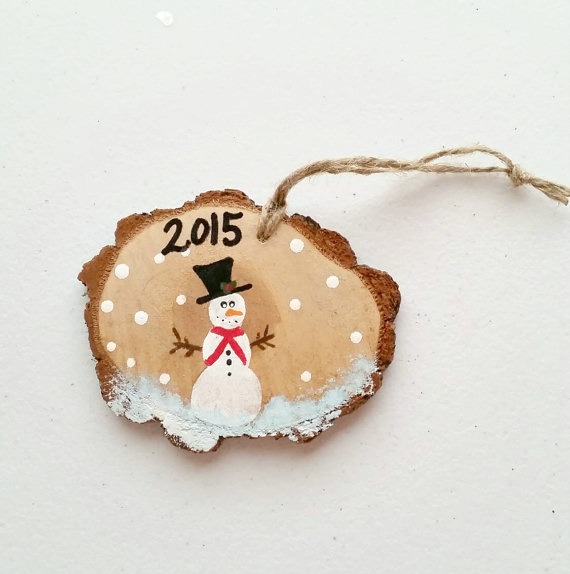
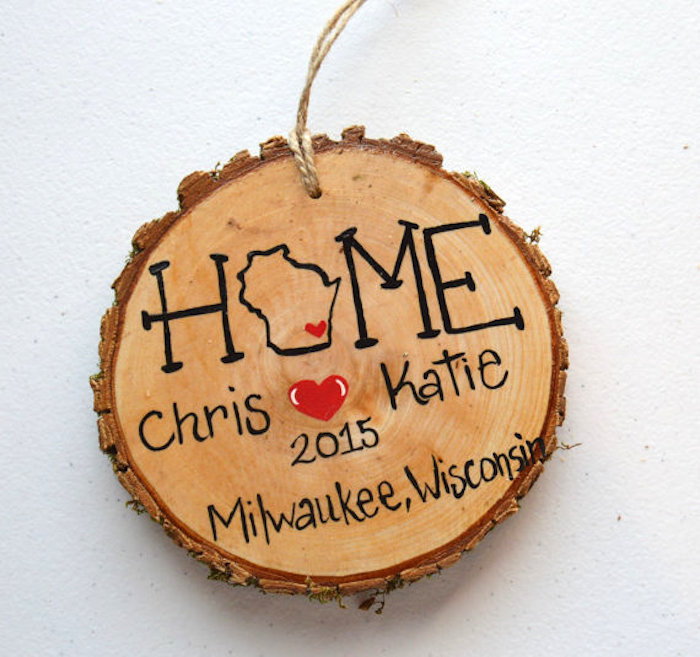
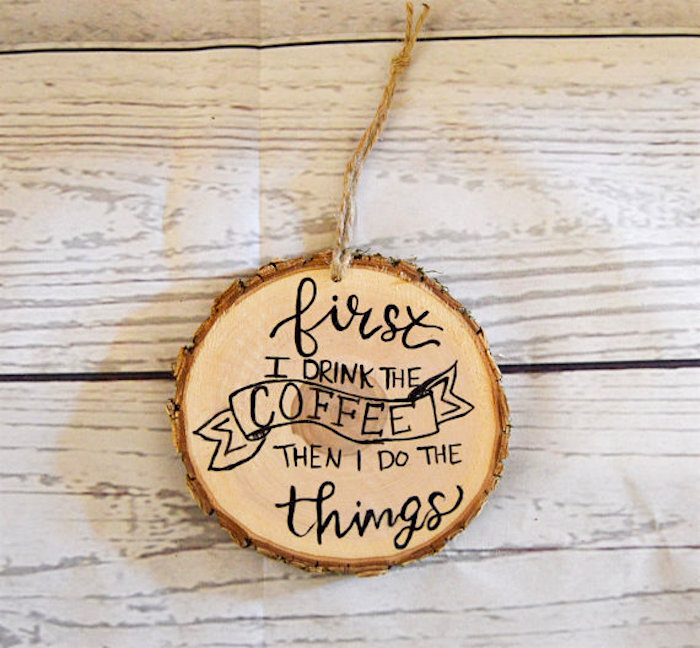
If you want, paint a layer of matte mod podge before starting to paint on the wood slice, in order to prevent ink bleeding; just be sure to let it dry completely. You can now apply two layers of chalkboard paint or using a marker or a pencil, draw the design you want on one side of a wood slice. You can write a phrase or draw a holiday figure, like a snowman, stars or a reindeer. You can also use a cute stencil or even stamps to make a design. Use markers and paint style pens to complete your design. Glue on fabric to make scarfs or hats and other decorations to bring your creation to life. Pull ribbon or twine through the hole and tie the ends together. Lastly, you can use a sealer to protect the ornaments and let them dry. Once dried, they are ready to beautify your Christmas tree.

Decoupage wood slice ornaments

You can easily apply the decoupage technique on wood slices. Black and white photos are great for this, but you could also use some Christmassy images that you can print and cut out. Here is what you will need:

A photo or other printed image (use a laser printer for printing or make a copy on a photocopy machine)

Acrylic gel medium

Mod podge

Small paintbrush

Pencil and scissors

Ribbon or twine

To make it, cut out your photo or image so it fits on the wooden slice. You can trace it with a pencil for help. Note: If you want to transfer words or phrases, be sure to use a mirror image of the word or phrase, in order for it to be readable after the process. Now coat the photo or image with the gel and put it on the slice, face-down. Use a credit card to smooth it out and remove any air bubbles. Turn it over and let it dry paper side down for a few hours, even overnight. Once dry, use a wet piece of fabric and lightly damp the photo and rub the paper away with your fingers very carefully. Use a circular movement to do that and add some water if needed. The paper will slowly come off revealing the transferred image. Now, coat it with a layer of mod podge and let it dry. When totally dry, you can use a ribbon or twine for hanging.

Etched wood slice ornaments

To make these you will only need:

Etching tool

Pencil

Ribbon or twine

Use the pencil to draw on the wood slices some simple items, like snowflakes, outline of a snowman or a tree or make even more complicated images if you can. Meaningful words are also wonderful. Now, having the drawing as your guide, use the etching tool to burn in the design. After that, all you have to do is to add a ribbon or twine to hang them.

Choose any one of these beautiful Christmas Craft: 3 DIY Wood Slice Ornaments to decorate your Christmas tree, door knobs, and chandeliers or use them as wonderful, unique gift tags. They will add a rustic look and your personal touch in whatever way you’ll choose to use them.


Receive Stagetecture's Daily Lifestyle Ideas

FREE - Daily emails with recipes, home decor, D.I.Y, and lifestyle tips! : ) Who doesn't need help?

Stagetecture.com is a participant in the Amazon Services LLC Associates Program, an affiliate advertising program designed to provide a means for us to earn fees by linking to Amazon.com and affiliated sites.


3 Comments

Sign Up for Home Ideas and Free Recipes!

STAGETECTURE NEWSLETTER

Subscribe to get our latest decor, recipes, and lifestyle ideas for FREE!!

Success! Now check your email to confirm your subscription.

There was an error submitting your subscription. Please try again.

We won't send you spam. Unsubscribe at any time. Powered by Kit

About Stella X

To read more of Stella's posts

« Sugar Free Dessert: Applesauce Cake Recipe
Easy DIY Gift: CD Picture Frame »

Comments

  1. Ilona @ Ilona's Passion says

    December 16, 2014 at 10:44 am

    Lovely blog! I like these wooden ornaments!

  2. angela jose says

    December 17, 2014 at 1:05 am

    They are really festive decors and very vintage. Would like to try them but maybe next christmas cz im already packed for my holidays 🙂

    Merry Christmas from India :)!!

  3. Stella X says

    December 20, 2014 at 6:18 am

    Thank you for your comments, Ilona @ Ilona’s Passion and Angela Jose! I love those, too! You could try using the same techniques to makewood slice coasters anytime!
    Merry Christmas to you, too, from Greece!

Leave a Reply

Your email address will not be published. Required fields are marked *

This site uses Akismet to reduce spam. Learn how your comment data is processed.

Search for Recipes & Home Ideas

Stagetecture's Community

  • 1 Fans
  • 6,420 Followers
  • 5,864 Followers
  • 1 Followers
  • 6,031 Followers
  • 4,720 Posts

Sign Up for FREE Recipes & Home Ideas!

STAGETECTURE NEWSLETTER

Subscribe to get our latest decor, recipes, and lifestyle ideas for FREE!!

Success! Now check your email to confirm your subscription.

There was an error submitting your subscription. Please try again.

We won't send you spam. Unsubscribe at any time. Powered by Kit
Simple Meal Planning - Plan to Eat

Stagetecture on Pinterest

Visit Stagetecture's profile on Pinterest.

Image Credits

Many of the images on this site are strictly inspirational and WE DON'T CLAIM RIGHTS TO THEM. We have put source text below the images or have used stock images. Please contact us for any questions or comments.

Amazon Associates Disclosure

Stagetecture.com is a participant in the Amazon Services LLC Associates Program, an affiliate advertising program designed to provide a means for sites to earn advertising fees by advertising and linking to Amazon.com.

Disclosures

Posts on this site may contain affiliate links. If you purchase anything through certain links, a small portion of the cost comes back to us. Affiliates help to offset the expenses of running this blog. Please see the disclosure policy and terms of use agreement for full details. Thanks for supporting our site! :)

Our Featured DIY Projects

How to Construct a Pallet Furniture Table

How to Construct a Pallet Furniture Table

My Festive Porch Fall Decorating with Lowe’s Fall Wreaths

My Festive Porch Fall Decorating with Lowe’s Fall Wreaths

DIY Room Decor: How to Make a Mason Jar Bathroom Organizer

DIY Room Decor: How to Make a Mason Jar Bathroom Organizer

How We Updated our Home’s Exterior Design with Mid-America Vinyl Shutters

How We Updated our Home’s Exterior Design with Mid-America Vinyl Shutters

Mason Jar Crafts: DIY Mason Jar Ideas

Mason Jar Crafts: DIY Mason Jar Ideas

Copyright © 2025 · Divine theme by Restored 316