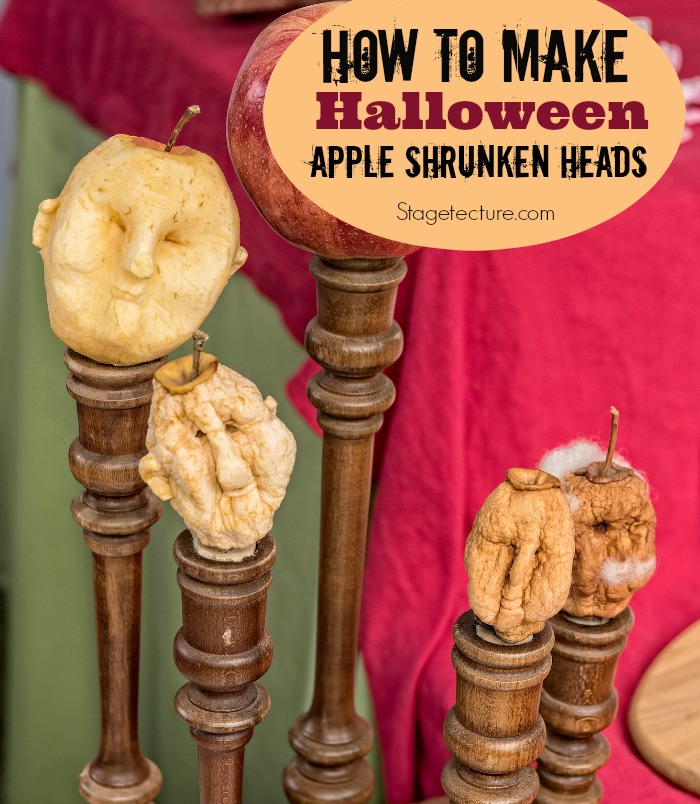
A DIY Halloween Craft can never get old! Looking for a fun and easy craft that you can use for decorating your house or give a creepy kick to a Halloween Punch? Here is a great DIY Halloween Craft to make, both easy and spooky! The instructions are simple and everybody should have all that is needed already in their home and as for the end result… well, it couldn’t get creepier than these shrunken heads!
DIY Halloween Craft: How to Make Creepy Shrunken Heads


DIY Halloween Craft Supplies
Large apples
Salt
Lemon juice
Water
Wire(optional)
Edible decorations ideas: black peppercorns, whole cloves, edible pearls
Non-edible decorations ideas: fur trims, yarn, pearl beads, brown permanent marker, staples, craft glue
Halloween Craft Directions:
- Peel the apples. You can choose to peel all of the skin or leave a little on the top to have a little hat, or on the bottom to have a base for your heads.
- Mix about half a cup of lemon juice and a half cup of salt together with about a half-gallon of water. The lemon juice will keep the apples so they will have a light and even color, while the salt helps drawing the moisture out.
- Let the peeled apples soak in the mixture for about half an hour.
- Take the apples out of the mixture and tap them dry with a towel. Now use the sharp knife and cut out the facial features. Make deep eye sockets, prominent noses, ears, mouths and anything else you can think of. It doesn’t need to be precise; after all, the faces are supposed to look creepy and distorted. When finished, put the apple back into the mixture.
- Sprinkle salt over the baking sheet or cut 10-12 inch pieces of wire to poke them through the top of the apples and out the side. Twist the wire’s ends together to secure the apple and then hang them from the middle rack of the oven. Turn the oven on its lowest temperature, at 170-180 degrees and back overnight or better yet for 24 or more hours. When going to sleep or out of the house, just turn the oven off and turn it back on when you are ready. Another way is to let the apples air-dry but keep in mind that this could take at least a week and it needs to be done in an area with low moisture.
- After drying, remove any wires and your shrunken heads are ready for decorating!
- Since the apples are stretchy at this point, try to pull and tweak them a little, to get the desired look.
- If they are going to be eaten or put into a punch, use only edible decorations. Whole cloves are a great solution that will also add flavor to the punch.
- To make non-edible shrunken heads, use the brown marker to color the eye sockets. Now use some craft glue to attach the pearl beads as eyes. You can insert some staples across the mouth and pin or glue some elements on the top as hair.
When not adding these creepy DIY Halloween Craft to a Halloween Punch or a Halloween Buffet, display them on a table or use a wooden skewer and poke the shrunken heads on them. Take some floral foam, put it in a bowl and just stick the skewers into the foam for a spooky decoration. Stick the skewers in a houseplant’s container or use a vase. Another great idea is to not remove the wire and use it to hang the heads from branches or making a garland… BOO!!!
For more Halloween ideas on Stagetecture, click here.
Receive Stagetecture's Daily Lifestyle Ideas
FREE - Daily emails with recipes, home decor, D.I.Y, and lifestyle tips! : ) Who doesn't need help?


[…] Shrunken Apple Heads via Stagetecture […]